Showing posts with label Computer Tricks. Show all posts

Saturday, November 11, 2017

Windows Repair v3.9.17 Pro Portable is Here! |stock rom go to rompure.com


windows-repair-pro-logo
Windows Repair
Windows Repair (by Tweaking.com) is a compact instrument that fixes most of Windows problems, such as registry errors, file permissions or problems with Windows Update, Windows Firewall, Internet Explorer, and more.
Often a program running on the system can get in the way of the repairs or even mess with them. By doing a Clean Boot with Windows Repair, no 3rd party programs will be running, lowering the process count to 45 or less. The result is multiple – there is no other program interfering with the repairs, and there are more system resources for the repairs, and the repairs themlseves will finish faster since the CPU, memory and hard drive are not be under the same load they would be if all the other programs were still running.
Windows Repair can do the following 
  • Reset Registry Permissions
  • Reset File Permissions
  • Register System Files
  • Repair WMI
  • Repair Windows Firewall
  • Repair Internet Explorer
  • Repair MDAC and MS Jet
  • Repair Hosts File
  • Remove Policies Set By Infections
  • Repair Icons
  • Repair Winsock and DNS Cache
  • Repair problems with .lnk (Shortcuts)
  • Repair Proxy Settings
  • Repair Windows Updates
  • Repair Windows Installer (MSI)
  • Repair File Association
  • Remove Temp Files
  • Unhide Non System Files
  • Repair CD/DVD Missing/Not Working
  • and more…
How to Activate?
  1. Disconnect internet
  2. Launch Windows Repair
  3. Block Windows Repair with your firewall
  4. That’s All, Enjoy
Screenshots


Downloads

Sharing is Caring

Sunday, November 5, 2017

How to Connect a Laptop or Desktop Computer to a TV Easily|stock rom go to rompure.com


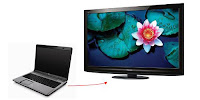
Suppose you wish to watch a movie or share a slide-show of pictures with your family on your PC but have a screen that leaves much to be desired. In such a situation, you can connect your computer to a television screen to allow your entire family to enjoy comfortably.

Connect Laptop Computer to Television
There are many ways in which you can connect your laptop/ computer to a television. However, the overall video quality will be different for different methods. You can choose which one to use based on the quality or the availability of hardware. The first step is to know what type of ports and connections your TV and computer have. If you already know the type of ports and connections available on your hardware, you can directly jump to Step 2. If not, then the different types of ports are explained in detail below:-

Connect PC or Laptop to TV
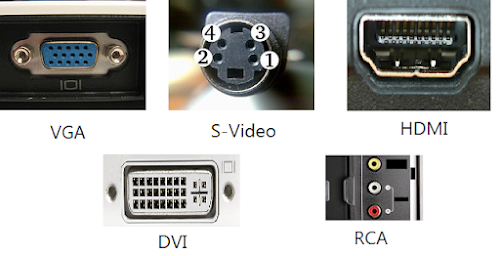
Different types of PC to TV connection ports
1) RCA/Composite: The oldest and the lowest quality connection available. They are the Yellow, Red and White connections most of us are familiar with. Yellow is used for composite video, white for left analog audio and red for right analog audio.

2) S-Video: S-Video or Super Video offers slightly better quality than Composite connections. As it is one of the oldest type of connections available, most televisions and computers have it. There are two types of S-Video ports, one containing 4 pins and the other containing 7 pins. This type of connection is used only for video. So you will need to connect an audio cable from your computer's headphone jack to the red and white audio inputs on your TV if you want audio to work.

3) VGA(Video Graphics Array): Most computers and televisions have a VGA port. It offers much better quality than S-Video and should be preferred if you have a HDTV. Older CRT TVs however, will not have a VGA port and will require a PC to Television converter. Just like S-Video, VGA also does not support audio and will require an additional audio cable.

Laptop Computer to TV
Different types of connecting cables to connect computers to TVs
4) DVI: Digital Video Interface offers much better quality than VGA connections. Most laptop computers and HD TVs will have these connections. Just as the name suggest, this type of connection can be used only with digital TVs. Also like the previous two, DVI connections also require the use of an audio cable for audio to work.

5) HDMI: The highest quality connections available. Most HD TVs will have this connection, however, chances are that your computer would not. If your computer happens to have a HDMI connection port, this should be preferably used. If your computer doesn't, you can use an HDMI to DVI adapter to convert HDMI to DVI.
connect laptop to tv

Step 2: Once a common type of port between the two devices is recognized, you will need the right connector cable to physically connect them. The different types of connector cables are pictured above. If you do not find two matching types of connection ports, you will need an adapter to make the connections type match.

Step 3: After connecting the two devices, on your TV, select the external input with which your TV is connected to the computer. It may be HDMI1 or AV1 depending on how you have made the connection. This is much similar to how you select input from your DVD player.

If you have followed the steps correctly, your TV should now be displaying your computer's screen.

Important: If your computer is not recognizing the external display, you must connect the TV before starting your computer. If the picture appears distorted, you will need to change the screen resolution of your TV by altering the display settings from your computer. Most older TVs will support only one display resolution while newer TVs will support plenty of them.

How To Disable YouTube Pre-Video Advertisements|stock rom go to rompure.com

How To Disable YouTube Pre-Video Advertisements

Disable YouTube Pre-Video Advertisements

There are a lot of ways to block ads, but with a simple command, you can disable all ads on YouTube by following the below given steps:

#1 Open up a YouTube video (any will work).

#2 Open up the developer console (Ctrl+Shift+J for Chrome, Ctrl+Shift+K for Firefox)

#3 Enter the following code:

12document.cookie="VISITOR_INFO1_LIVE=oKckVSqvaGw; path=/; 
domain=.youtube.com";window.location.reload();


#4 Boom, you just disabled YouTube Pre-Video Advertisements.


P.S When you close the window and reopen it, you need to add the command again for disabling the ads.

How To Boot Into Windows 10's Safe Mode ?|stock rom go to rompure.com

How To Boot Into Windows 10's Safe Mode ?


Contents:
Method One: System Configuration
Method Two: Tapping F8
Method Three: Shift + Restart Combination
Method Four: Boot From A Recovery Drive
Method Five: With Auto Registry

Method One: System Configuration

The fastest way to launch System Configuration in Windows 10 is to use the Run window. To do that, press the Windows + R keys on your keyboard. Then, write msconfig in the text field and and press Enter or OK.


Another way, to reach the System Configuration screen by using Cortana search. Typing either msconfig or system configuration and pressing Enter will open the System Configuration panel.


Head to Boot, and note the Boot Options. Selecting Safe Boot from the options will force your system to boot into Safe Mode followings its next restart.


You can choose from additional options. Here’s what they do:

Minimal: Starts Safe Mode with the absolute minimal amount of drivers and services, but with the standard Windows GUI (Graphical User Interface).

Alternate Shell: Starts Safe Mode with a Command Prompt, without the Windows GUI. Requires knowledge of advanced text commands, as well as navigating the operating system without a mouse.

Active Directory Repair: Starts Safe Mode with access to machine-specific information, such as hardware models. If we unsuccessfully install new hardware, corrupting the Active Directory, Safe Mode can be used to restore system stability by repairing corrupted data, or adding new data to the directory.

Network: Starts Safe Mode with the necessary services and drivers for networking, with the standard Windows GUI.

Select Minimal, followed by Apply, and OK. Windows 10 will tell you that you need to reboot your device in order for the new setting to take effect. You can select to "Exit Without Restart" if you want this effect to happen later. If not, you can Restart Now and your device will automatically boot into Safe Mode.


Method Two: Tapping F8

The most common method of reaching Safe Mode was by tapping F8 but Windows 10 has F8 Safe Mode disabled. But here I will show you how to enable that option by using Command Prompt.
Right-click the Start menu and select Command Prompt (Admin). Select Yes in the User Account Control dialogue, if it appears. Command Prompt should now be open.


Type or Copy/Paste (Don't use CTRL+C or CTRL +V) the following command:
1bcdedit /set {default} bootmenupolicy legacy

And press Enter. Job done!


To undo this legacy command at any time, reopen the elevated Command Prompt as per the above instructions and type:
1bcdedit /set {default} bootmenupolicy standard

Method Three: Shift + Restart Combination

Use the SHIFT + Restart combination. Open the Start Menu and click or tap on the Power button.


Then, keep the SHIFT key pressed and click or tap on Restart.


Then, Windows 10 will reboot and will open Advance Boot Options. Choose Troubleshoot.


Then, on the Troubleshoot screen, select Advanced Options.


On the Advanced Options screen, choose Startup Settings.


Windows 10 will tell you that you can restart your device in order to change Advanced Boot Options, including enabling Safe Mode. Press Restart.


After Windows 10 reboots, you can choose which boot options you want to use; use F4 - F6 to use the Safe Mode boot option.


Shortcut Method:

Open the Settings menu and head to Update & Security > Recovery > Advanced Startup. Clicking Restart Now will restart your system in recovery mode.

Method Four: Boot From A Recovery Drive

Use the Recovery Drive app to create a system Recovery USB Drive.


Once USB recovery drive is created, use the drive to boot your Windows 10 device and, when you're asked to load its content, do so.

The first screen will ask you to choose the layout for your keyboard. Select the one you want to use, or if you don't see it listed, press on "See More Keyboard Layouts" to get the complete list of available layouts.


Once you chose your Keyboard Layout, on the Choose an option screen, select Troubleshoot.


After selecting the Troubleshoot option, follow the instructions giving in the "Method 3".

Method Five: With Auto Registry

To Boot into Safe Mode you can copy the text below to Notepad and save it the extention .REG and then launch the file.

1234567RunWait('bcdedit /set {current} safeboot Minimal', "", @SW_HIDE)
;Runwait(@ComSpec & ' /c ' & @WindowsDir & '\system32
eagentc /enable', "", @SW_HIDE)
RunWait('bcdedit /copy {current} /d "Windows 10 (Safe Mode)"', "", @SW_HIDE)
RunWait('bcdedit /deletevalue {current} safeboot', "", @SW_HIDE)
RunWait('bcdedit /set {current} bootmenupolicy standard', "", @SW_HIDE)
RunWait('bcdedit /timeout 5', "", @SW_HIDE)

How To Hide Local Disk Drive Using CMD Diskpart|stock rom go to rompure.com

How To Hide Local Disk Drive Using CMD Diskpart

As Every computer user have some personal or private data which they want to hide or protect from others. If you want to Store Less amount data which you can easily Store in Folder.

But If You want Hide large account of data or want to hide full drive from others. Then follow these steps carefully

Hide Local Disk Drive Using CMD Diskpart

Steps To Hide Your Local Drive

  • Go To Start >> Then Run >> Then Type Diskpart
  • New black Window will appear and then type list volume press enter
  • Now your all drive will appear, now if you want to hide Drive D
  • Then Type select volume X and press enter. (Replace x with volume no)
  • Then Type remove letter D and press enter again.
  • Now Go to your my computer then you will find that your D drive is hidden.

Steps To Get Back Your Hidden Drive

  • Go To Start >> Then Run >> Then Type Diskpart
  • Then Type list volume press enter
  • Now your all drive will appear, now if you want to unhidden Drive D
  • Then Type select volume X and press enter. (Replace x with volume no)
  • Then Type assign letter D and press enter again.
  • Now Go to your my computer then you will find that your D drive is unhidden.
Then your Hidden drive will start appearing. Lets take one look on all steps in this figure

Note:- Volume No of each drive is according to its drive letter. Never use the same values as mention in the post. Volume no is just before the drive letter.

How To Stop/Disable Windows Updates In Windows 10|stock rom go to rompure.com

How To Stop/Disable Windows Updates In Windows 10

Microsoft release its new Windows 10 with its latest features and attractive look. Windows 10 becomes popular because it is free to install and user can update it from any of previous version of Windows. Windows 10 provide multiple desktop, that is each desktop with a separate task. New users of Windows 10 also like its personal assistant called cortana.
Windows 10 provide automatic update feature. It’s smart service automatic find and download, install its latest updates when we connect to internet. This feature is good for users how have unlimited internet connection. But some users are not interested in updating windows. There are many reason behind that like some user have limited internet pack or other reasons include software compatibility issues etc. Windows 10 do not provide feature to stop this automatic update in its Windows update settings. If you also suffer from this feature of Windows 10 and wanted to stop it then this article is really for you. In this article we are going to explain about different methods to stop automatic updates of Windows 10.

Method 1st :- Stop Windows 10 Updates From Services.


Step 1. To stop the windows 10 updates you should first go to the control panel.
Step 2. In the control panel go to Administrative tools.

control panel Administrative tools

Step 3. Then look for services option.

adminstrative tools services

Step 4. In the services window you will see many types of windows services running.
Step 5. In this window scroll down and to find windows update service and turn off it.

Windows 10 services

Step 6. To turn of this service you have to right click on the service and click on the properties option.
Step 7. In the properties options select general setting.
Step 8. In the general setting look for start up type option and select disable option.
Step 9. After that look for service running status and click stop button.
Step 10. Click on OK and your automatic updates will stop after that.

windows 10 update service properties

Method 2nd:- Disable Windows 10 From Network Settings


If you have limited internet connection and you want to stop automatic updates of Windows 10 and other Application then you can take advantages of Windows 10 Amazing feature called metered internet connection. By using this feature you can stop Applications and Windows from updates. To set your internet connection as metered you have to follow the below steps.

Step 1. Open the settings Apps in Windows 10.
Step 2. After that select Network & Internet.

Windows 10 settings

Step 3. After that Scroll down and look for Advanced options.

Windows 10 settings Network and internet

Step 4. Then select the Set as metered connection option.

Disable Windows Updates In Windows 10

Step 5. Now this option will be set for all WiFi Network.So these are some best possible ways to turn of windows 10 updates. In case you have any problem or you know any other best method let us know.

How to automatically redirect Blogger blog to another blog or website|stock rom go to rompure.com

How to automatically redirect Blogger blog to another blog or website

That is you can redirect your specific post URL to another post or page, all 301 or 302 redirection within your blog. That will be useful for redirecting 404 error pages and broken links; however with that you cannot redirect homepage to any particular URL. Here we will show you how to automatically redirect Blogger blog to another blog or website or any URL. So with this technique you can redirect your Blogger Homepage or any particular page to external websites.

redirect Blogger blog to another blog

When to use this?

This one will be useful if you have just migrated to new domain with new blogging platform. You are always limited in Blogger that’s why people moving to self-hosted wordpress blogs. Usually you won’t get much traffic to your new blog when you just shifted. Also your old blog will have some decent traffic flow from organic search results as well as from backlinks. So by using this method you can drive traffic from your old blog to your new blog and also it passes all the ranking factors.

How to redirect Blogger blog to another blog / URL / Website

Here we will share three different codes that automatically redirect Blogger blog to another blog or URL and each code does different tasks.

Let’s say you want to redirect your complete Blogger blog to another page or URL. That is redirecting your homepage, posts page, archives page and all other URL in your blog to another specified external website. You have to use this if you just moved to new domain. To do this you are going to make changes to your template file. So before you mess up with the codes it’s recommended that you backup your template first.

1. Login to your Blogger dashboard

2. Go to template and click edit HTML

3. Now you can see template codes. Press CTRL + f and then find <head>

4. Now add the following code below head tag

12345<script type='text/javascript'>
  var d='<data:blog.url/>';
  d=d.replace(/.*\/\/[^\/]*/, '');
  location.href = 'http://yourdomain.com';
</script>

In the above code change http://yourdomain.com which is the destination URL. Now all your pages from the blog will be redirected to destination URL.

Now we will see another piece of code that redirects particular blog URL to another blog or website. If you wish not to redirect the whole blog then you have to make use of this code. Also you can use this for redirecting user from a particular page to another external website for promotional purpose.

To do this just paste the following code below head tag and change the from URL that is http://yourblog.blogspot.com and destination URL that is http://yourdomain.com

123456<script>
if(window.location.href == 'http://yourblog.blogspot.com ')
{
window.location="http://yourdomain.com";
}
</script>

The above code just redirects user from the specified BlogSpot URL to another website or URL.

Here comes another code; with this you can redirect all your blog pages including home page to another blog or website with specific set time. So users who lands in your blog will be automatically redirected to anther blog after a specific time period.

1<meta content='5;url=http://yourdomain.com' http-equiv='refresh'/>

This is the code, just copy and paste below the head tag in your template file. In the above code 5 is the set time where users will redirected to http://yourdomain.com in 5 seconds after landing.

Hope this article guided you on how to automatically redirect Blogger blog to another blog / website or URL. Share this and if you found it useful then please leave your comments.

How To Create Dial up Connection In Windows|stock rom go to rompure.com

How To Create Dial up Connection In Windows

Internet is become a part of our life. we daily use internet for different works and without internet our PC or other devices become boring if we don’t have any offline work to do. So we use internet for accessing Google, Facebook, YouTube and other sites from desktops and laptop as well. But using internet through wire connected broadband services is not so comfort. So we use wireless connections like WiFi or we use own mobiles phones to access internet with USB or WiFi.
But weather a USB connection or wireless we install device drivers but we may face problem in connection setup. So dial-up connection is the only simplest way to start using internet from mobile phones. Today i will help to setup dial-up connection if you don’t know how to setup and use internet with better speed then must read and follow below given steps.

Steps To Setup Dial-up connection for Mobile Devices.


Part 1:- Network And Sharing Settings

  • Click on Start Button >> Then open Control Panel >> Then change view from top right corner to Large Icons.
Control Panel
  • Open Network and Sharing center and click on Set up a new connection.
  • Then Click on Setup a new dial-up connection.
dial-up connection
  • Now new settings window will appear. Where you have fill correct information as shown in below image.
  • Dial-up phone no:- *99# (Default no) Or *99***1# it may vary for different countries.
  • Username and Password in case if your ISP connection is secure then add both or otherwise leave it.
  • Add your connection name and click on connect button.
dial up setup
If you successfully able to connect with internet then its good otherwise also follow Part 2 settings for Phone settings.

Part 2:- Phone And Modem Settings

  • Open your Control Panel and then Phone and Modem.
  • Then add your Country code or Area code (Postal code) and click on OK button.
  • Again open Phone and Modem >> Then Switch to Modem Tab.
Phone and Modem
  • If your Device is available and attached to any port then select it and click on Properties.
  • New window will appear then click on Change Settings button.
  • After refreshing window will appear again. Now switch to Advanced Settings Tab.
  • In Advanced tab there is an option of Extra Initialization Command.
AT+CGDCONT=1,”IP”,”Mobile-APN-Here“,<cr>
  • Replace Mobile-APN-Here with your service provider APN (access point name)
Extra Initialization Command
  • Just like i am using Bsnl connection on my mobile phone so bsnlnet will comes in the place of APN and in the same way your connection will comes.
  • Then paste this command and save your settings and make sure that command should be correct otherwise internet will not works.
After doing all these settings i hope you will be able to use internet with dial-up connection for your mobile or wireless devices.

How To Hide Files & Folder In Windows 7, 8, 10|stock rom go to rompure.com

How To Hide Files & Folder In Windows 7, 8, 10

There are various method provided by windows to hide our data. If you do not know how to hide your files and folder then don’t worry because in this article we explain about different methods to hide folders with inbuilt windows feature.

Hide Folder Or Files Windows Option


#1. Hide With Windows Folder Options


1. Double click on My computer icon. Now you see my computer Window.
2. In My computer Window, look for organize button.
3. Click the Organize button. Now you see a dialog box.
4. In the dialog box windows click on Folder and Search option.

Folder and Search option

5. Now you see another dialog box. In the next dialog box click on view button.
6. In the Next windows you see hidden files and folder option.
7. In the hidden files and folder option select the Don’t show hidden files and folder radio button.
8. Click on Apply button and then click OK.


In case you want to show hidden files and folder then select second option given below the don’t show option as shown in above image.

#2. Hide Folder From Files Properties


1. Right click on the folder which you want to hide.
2. After right click you see a popup menu.
3. Under the menu select the properties option.

Folder Files Properties

4. After clicking properties you will see a dialog box.
5. In the dialog box under the general Tab you will see a attributes option.
6. In front of attribute option tick the hidden option.
7. Click on Apply button and then click OK. Now your folder become completely hidden.

Hide Files & Folder In Windows

If you want to see hidden file or folder then you need to follow 1st method explained in this article. Simple select show hidden files option and then again open properties of hidden file and uncheck the hidden option.

How to Boost and Increase your Internet Speed|stock rom go to rompure.com

How to Boost and Increase your Internet Speed

This article we will be looking at some important tweaks which help us in optimizing the Internet speed.

Increase Internet Speed

Tweak: Un-reserving bandwidth:

By Default, Windows reserves 20% of bandwidth for it’s own use.This should be undone immediately to optimize your net speed.To do so you need not install any extra program,you can do this with a simple setting given below.
  • Press “Windows key + R“(shortcut key for RUN).
  • Now type gpedit.msc.This will give access to Group Policy Editor.

Group Policy Editor

  • Then Navigate to Computer Configuration/Administrative Templates/Network/QOS Packet Scheduler using the pane on the left side.
  • Now in the right panel you will notice a option called “Limit Reservable Bandwitdth“.Right click on it and choose “Edit” option.
  • A new window will pop out where you find Bandwidth Limit is set to 20% by default.Now click enabled and change Bandwidth Limit to 0 then apply the changes.

Bandwidth Limit

  • Hit ok the close the group policy editor.

So this was our guide on How to Boost and Increase your Internet Speed , I hope the methods given above helped you.

How To Play PlayStation (PSX) Games On PC|stock rom go to rompure.com

How To Play PlayStation (PSX) Games On PC

PlayStation games are very popular in people because of graphic quality and realistic visualization. To play PlayStation based games we need PlayStation console. Which is little bit costly. So it is not possible for everyone to buy the PlayStation. Sometimes parent couldn’t allow their children to buy PlayStation because children already having PC for gaming. So all that conditions their are some possible ways to enjoy PlayStation games easily on you PC. In this article we will explain you the best possible ways to play PlayStation games on you PC. You just need to follow few steps and need to install few files for playing PSX games PC.

epsex

Steps To Play PS Games On PC


1. First of all you have to check your PC to meet the minimum requirements to Run the play station emulator.
Minimum Requirements :
  • You have at least 1 GHz Processor.
  • Minimum 512 MB RAM.
  • CD/DVD Rom so that you can run games through CD/DVD Disc.
  • 3D Graphic card with computer graphic interface to display game graphic smoothly.
  • PSP or USB controller that allow you to plug into your computer and so that you can use the controller button instead of mouse and keyboard.

2. Download the ePSXe emulator from the official ePSXe website that is www.epsxe.com. You can download it downloads section.
3. After downloading the file you have to run the .exe file. you have to follow the simple wizard instructions for installation process.
4. In the installation process in the last step you have to get Bios image file of your emulator. For getting these files you should have Sony legal license.
4. After the installation is completed you see the epsxe emulator icon on desktop.
5. Double click on the icon to run the program.
6. Insert a Play station game disc into your PC CD Rom to start the game. Now you can enjoy to play the game.
7. You can also use the game ISO file to play the game that is stored somewhere in the system.

epsex emulator

Note:- In the same Manner you can install emulator for Play Station-2.This best and easiest method to play PlayStation games on PC. You just need specific emulator which provide you the platform to run PS games. If you want to latest PS based games then you need compatible hardware configuration and emulator.

I hope you like this article and easily able to play psx games on PC.

Friday, November 3, 2017

Download Truecaller For PC: Windows 10/7/8.1 and Mac|stock rom go to rompure.com

Download Truecaller For PC: Windows 10/7/8.1 and Mac

Download Truecaller for PC and Laptop: Gone are the days when prank calls were fun and our identities and number were safe. Today, nothing is safe or hidden, because someone somewhere is developing a way to uncover all the secrets. Truecaller is here to protect you from spam callers by showing the details of any unknown number. You can easily be aware of the spam calls because in Truecaller dashboard, spam calls are flagged with a red badge. You can download the install the Truecaller for PC or in your laptop using some simple techniques that are not unique but need step by step guidance. In a world where IT is the fastest booming industry and artificial intelligence is on its way to take over the world by storm, it is better to be safe than sorry. That said, IT has made many things possible; however these things have a good side as well as bad one.
The bad side allows hackers, terrorists and rebels to make a simple call trace the number and then use that number to make future communication, all without the number owner’s knowledge. For the owner, he simply answered an unknown number calling on his number and now is might even be framed into being a part of some dangerous racket or activity. Thankfully, the increasing number of such instances led a genius to come up with an application to avoid this. Now let’s dig in to the the main thing which is how anyone can easily download Truecaller for PC in just 10 minutes following the steps mentioned below.
Truecaller for PC and laptop

Developed by True Software Scandinavia AB, Truecaller has become the world’s largest mobile number community and is accessible through a website. The application is also available on Android, Blackberry, iOS, Windows and Symbian phones. Once installed on the phone, it can automatically run a search for an unknown number calling on your number. Thus, you can answer the call only as long as you recognize the name flashing on the screen.

The application is designed to search through a complete phone directory and find the number as saved on some device. Thus, the name appearing on the device will be shown under the name as saved by someone else. Although it is an important application for phones, one can also use Truecaller on their desktop PCs or laptops. This article will teach you the steps you must follow to get Truecaller on your PC or laptop.

What is Truecaller- App for Tracing Anonymous Calls

Before we get into more details it is very important to know the procedure and the major reasons for downloading Truecaller for PC, let us explore the features offered by Truecaller:
  • This application successfully traces the name of the caller without having to answer the call which has helped many.
  • Truecaller for PC or mobile is highly recommended since it’s a global app; it locates both national and international numbers.
  • Truecaller application helps you to block spam call, report a spam number and even block messaging from unwanted numbers.
  • There is also a provision given to users by the application developers which allows you to create your own profile on Truecaller, making you easily findable on the app.
  • Truecaller has no in-app purchases or extra costs for use.
In order to use Truecaller without having to install it anywhere, you can simply go their official website – Truecaller.com, and login using your Facebook, Yahoo or Google account. Then, type the number you want to trace in the bar on the screen and click on ‘search’ icon. Within seconds, Truecaller will display the search result which will tell you the name, area that it belongs to and any reports about the number. Thus, you can choose to answer or not depending on the result you obtain from Truecaller.

Download Truecaller for PC (Windows 10/7/8.1): Tutorial

How to Run Truecaller for PC running on Windows: Besides this, Truecaller can be installed on your PC or laptop for both Windows and Mac so that you can use it offline too. In order to this, you must first download an android emulator for your desktop or computer. Android emulator creates a virtual android system on the computer, enabling the user to use android application on their laptop or PC. This article will guide you through the process using Bluestacks android emulator.
  • Download Bluestacks (get here) on your PC or laptop. Once downloaded, install the application on your system.
  • On completion of the install process, run the app by double clicking on it.
  • When the window opens, type Truecaller in the search bar seen on the screen.
  • Download Truecaller on Bluestacks. On being downloaded, click on ‘install’.
  • Once the installation is complete, you are now enabled to use the most utility application – Truecaller, on your Windows or Mac PC/laptop.

Download Truecaller for Mac- Tutorial

How to get Truecaller for Mac:If there is any difficulty in the above method, there is an alternative method too. Following are the steps required to be followed to use the alternate method:
  • Download and install Bluestacks on your Windows or Mac PC or laptop.
  • In Google.com, type Truecaller.apk and download the .apk file format for the application.
  • On downloading the file, double click on it to run the application.
  • The file will directly open with Bluestacks. Install the file once it opens on Bluestacks.
  • Once the installation is complete, Truecaller for PCis now ready to be used on your PC or laptop.
Truecaller is a must have application for everybody on their phones as well laptop or PCs. This is because the evil in the world is rising at the same pace as the good. And moreover, it is better to take precautions rather than becoming a victim to dangerous ploys created by others to harm the world. Truecaller safeguards you against spam calls and messages and that is necessary in today’s world. This application has become everyone’s first preference when it comes to searching an unknown number. As conveniently as this application can be used on smartphones, Truecaller for PC is also a boon. In fact, this application Truecaller on PC only makes the experience better. People today, wait for Truecaller to show the display which hardly takes a few seconds before answering any calls they get from unknown numbers.

Truecaller for Windows 10

Truecaller has indeed made life easy for many, as it helps to identify the callers whose numbers are not saved in our phonebook. It also helps to block unnecessary callers or spammers. But it is an added bonus to have Truecaller installed on our PC/Laptop too running on the latest Windows version i.e. Windows 10. So now we will be telling the exact process on running Truecaller for Windows 10 without any glitches.
Honestly speaking downloading Truecaller on Windows 10 is very easy, as you don’t need to do any extra things for that. You just need to download and install any working Android emulator on your PC (like bluestacks/Andy), and after logging to that you can easily download Truecaller on PC even if it’s running on Windows 10 OS.
Wrap Up
This quick and very informative application is a must have in any kind of technological devices which you are dealing with. Truecaller for PC and mobiles will only help in keeping you safe and sound from mysterious terrorist calls and even from annoying company calls. Since, this article has already given you a few tips on downloading this application for PC/Laptop or Mac, Truecaller is not an app you can miss out on.