Showing posts with label How To ?. Show all posts

Thursday, November 16, 2017

How to Add Additional Domain to Hostgator Hosting [New cPanel]|stock rom go to rompure.com


I have previously posted a detailed review of Hostgator hosting, and despite problems I have had with Hostgator in the past, they are still one of the best shared hosting solutions for WordPress.

Hostgator offers various hosting plans, the most popular of which is the Baby hosting plan.  This plan offers unlimited bandwidth, unlimited storage, and unlimited domains. This means that with one Baby hosting plan, you can host unlimited websites! I personally host five medium traffic websites on Hostgator’s Baby plan, and my uptime is great.

Additional Domain To Hostgator Hosting

Many new users who sign up for Hostgator are unaware of the opportunity to place an add-on domain (or several) into their Hostgator account. In this tutorial, I will explain how you can add more domains to your Hostgator account.
Even if you have purchased a domain from a source such as GoDaddy or Name Cheap, all you need to do is change the name server of your domain to point to your Hostgator account, and add your domain as an add-on domain from the cPanel in Hostgator.

How to use Hostgator’s add-on domains feature:

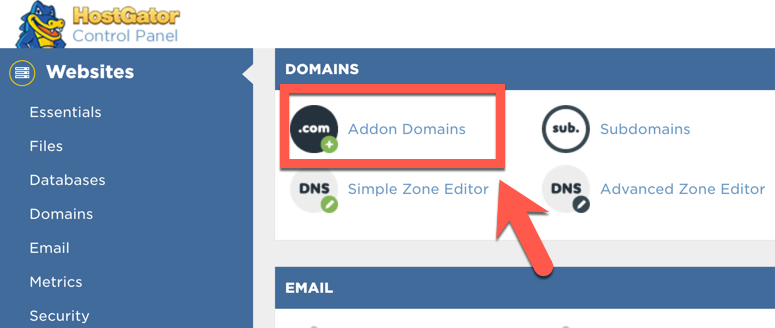
This tutorial is valid for either the Baby or business shared hosting plan. Login to your Hostgator account and click on “Add-on domains” under the domains section. See the screenshot for better understanding:
You will be redirected to the Add-on domains screen, where you need to enter a few details which I have explained below.
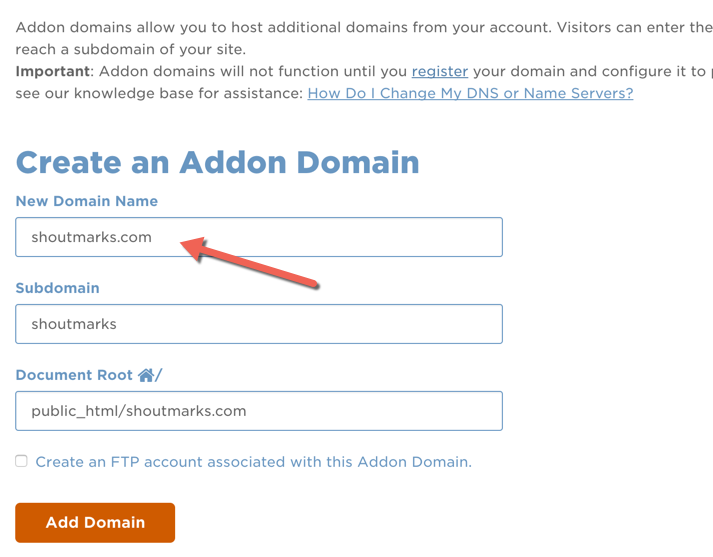
In the box to the right of “New Domain Name”, enter the domain name you wish to add to your Hostgator account. If you want to create a dedicated FTP account for your addon domain, select the option that says “Create an FTP account associated with this Addon Domain.”
You need to create an FTP username and password. You can choose your password yourself or you can generate a complicated password by using the password generator offered under cPanel. The “Document Root” section defines the root of the domain you are adding.  I usually use Public_html/domainname as the Document Root, as it makes it easier for me when I need to give FTP access to developers.
Here is how final screen would look like:
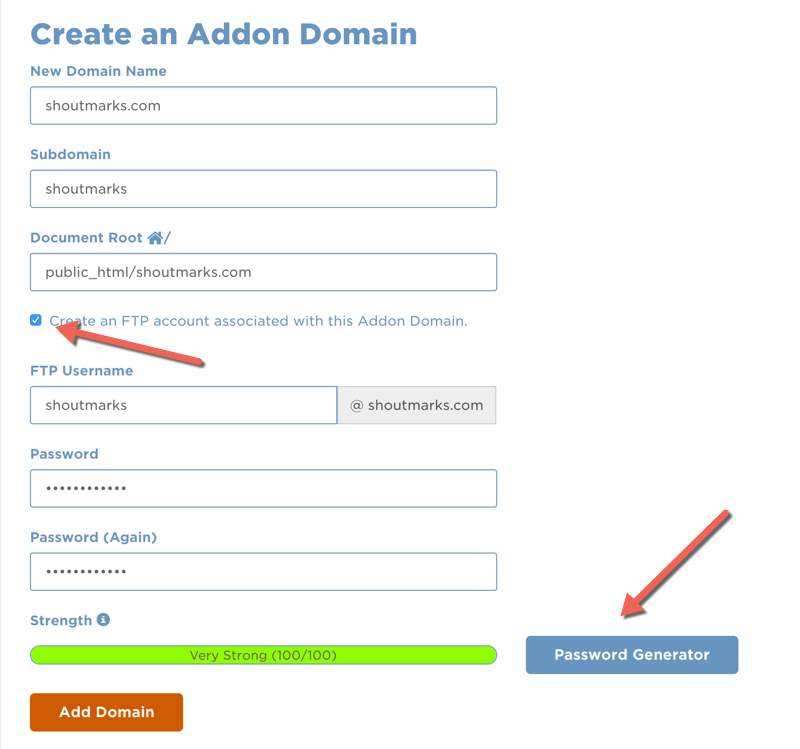
Once done, click on “Add Domain” and you have successfully added an additional (add-on) domain to your Hostgator account!
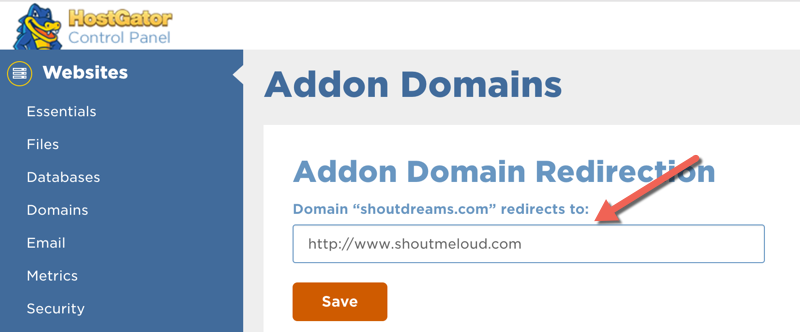
This feature is also useful when you have purchased other domain extensions (.org, .info, etc.) to preserve your brand name. After adding the additional domains, you can use Hostgator’s redirection feature on the same page, to redirect the add-on domains to your main domain name.
This tutorial will work with any other web-hosting company (Ex: Bluehost) which offers standard cPanel.


What to do next after adding a domain:

Again, you can use the redirection feature to redirect any additional domains to your main domain. If you creating a new blog, you can refer to my guide on How to Install WordPress on Hostgator.
Note: If you have several domains under your domain registrar and you are not doing anything with them, I recommend that you install WordPress instead of keeping them idle, and read my guide on SEO for parked domains to make the most of this concept.
Check out Hostgator


Use the comments section below to let me know if you have ever used the add-on domain feature from within your Hostgator cPanel account.


As always, if you have any questions, feel free to ask.

If you find the information in this post useful, please share it with your friends and colleagues on Facebook, Twitter and Google Plus.

Tuesday, November 14, 2017

How to Promote Affiliate Products On Your Blog|stock rom go to rompure.com

Promote Affiliate Products On Blog
Here at ShoutMeLoud, I am continually sharing ways in which you can earn money from your blog. One of the most effective ways is through affiliate marketing. In affiliate marketing, you choose a product related to your blog niche, create product awareness, and then when somebody buys a product using your affiliate link, you receive a referral commission from it. If you are a complete newcomer to affiliate marketing, here are some articles that will give you all the information you need to get started:
Here are a few affiliate products that you can get started with:
If you are already familiar with the information in the articles listed above, let’s get to work on some promotional tips for an affiliate program you may have joined.
*Note:  There are other promotional networks such as PPC marketing  and email marketing, but in this article I am sharing tips that I use on my own blog which help me to improve my affiliate conversion.  At the conclusion of this article I will also be sharing one mistake which most of the affiliate marketers are making! Read on:

Affiliate marketing tips to promote affiliate products:

Review post:
Nothing beats a killer review post about a product!
A review article introduces the product to your blog readers, and at the same time your opinion guides them to understanding why they should be buying it. Here are few things that you should always remember when writing a review post for your affiliate product:
  • Reviews should be honest. Most of the time, people just focus on the good points about a product and fail to mention any downsides. An honest review should include both sides of the coins. Remember to also add product images, and give all the useful information you have to offer about the product.
  • Write a review in a personal tone, as people are looking for a personal recommendation in review articles.
  • Pick a product that you are more likely to use yourself.
  • Take advantage of star-ratings in search engines to get more CTR for your review articles. You can use the Author Review plugin to add star-ratings on your blog posts. Your results in SERP’s will look like the image below:
Affiliate product CTR
Blog post promotion:
Another way to promote your affiliate income is by using affiliate links to your own blog post. When doing this, you should always write targeted-posts. For example, when you are writing about How to Select the Best Hosting for your WordPress Blog, you can add a line at the end saying: “I recommend this particular host for a WordPress blog:” (insert your affiliate link).
How-to articles:
A DIY kind of article always works great for affiliate product promotion. If your product is technical or needs instructions to be used, you can write a tutorial guide for the product. Here are few examples, for better understanding:
Such tutorials are not only handy, but will also help you to improve your search engine ranking. “How To” articles always perform very well in search engines.
Use coupon codes:
Believe it or not, money-saving is always the biggest marketing incentive. Whenever a customer is buying a product and he sees a coupon box,  he searches for “Product Name + coupon”, and with the resulting coupon code, you still receive a good commission for the sale.
Remember, your goal as an affiliate marketer is not just to share the coupon, but to make the customer click your affiliate link, else the sale will not count as yours’. (There are exceptions for certain affiliate programs where coupons are considered as sales.)
You can also consider writing a monthly blog post for coupon codes. (Example: Web Hosting Coupon Codes for September 2013), etc.
If you notice on various coupon sites, they will always ask you to “Click to view coupon”, “Click to go on the merchant site” and so on. The reason for this is to drop the cookie. Here is an image as a reference:


Affiliate coupon code
Use featured post:
Be it a review post or be it a coupon code post, your goal is to get more views on these posts. Apart from On-page SEO, you should give more visibility to such a post by placing it as a featured post. There is a handy feature in WordPress that allows you to stick any blog post on your blog’s homepage. Here is how you can do it:
Make a Post sticky WordPress


In the “edit post” section, click on “Visibility” and put a check mark beside “Stick this post to the front page”. I have tried this with a few pillar posts at ShoutMeLoud, and it has really increased my reader base.
Use banners on the sidebar
When you are getting targeted organic traffic to your blog, banner advertisements work great. For me, a great part of the conversion comes from banner clicks. Prominent banner placement is a worthwhile task. One of the mistakes which many of us regularly make is to add too many banners, which only serves to confuse the reader.  To avoid this problem, follow this one rule of thumb:
Never place banner ads for similar products on your sidebar: Banner ads work as a recommended product.  With multiple similar products, you are confusing your readers in their decision of which product to buy. It is a good idea to place products that are related to a certain niche within that particular niche. For example, in a blog post about WordPress tips you can place a banner ad for: Themes, Plugins, Hosting, Services, etc.


Affiliate ad management


If yours’ is a multi-niche blog, you should consider using the Adrotate plugin for your ad management. This plugin will help you to show ads based on category and geographical location.  You can also run A/B testing of different banners.
Bonus Tip: Link out to the website directly, instead of to your review post. One of the biggest mistakes most affiliate marketers make is that they try to link to their review post or internal post. This is wrong because a product landing page is always optimized for higher conversion, and will obviously be better optimized than your own review post. In the past year I have started linking directly out to the product landing page instead of to my review post, and this has resulted in my conversions skyrocketing.
Learn all about Affiliate marketing in one eBook : Buy from ShoutMeLoud store
Here are new ideas which will work in 2016:
  • Mention Products in epic post
  • Create a course/series article around the product
  • Product Giveaway
  • Comparison post
  • Create a post when product adds a new feature
  • Create an alternative products post (Ex: Aweber alternatives)
  • Write a post on why I switched from X to Y
  • Create a resource page
  • Create videos explaining about the product
  • Create list post & include the product
  • Create Coupon/deal specific post for product
Let me know if you have other tips that you follow on your blog to improve your own affiliate conversions.
If you have found this article useful, please remember to share it with others on Facebook & Google+.

Sunday, November 5, 2017

FaceTime Not Working on iPhone/iPad/Mac (Easy fix)|stock rom go to rompure.com


FaceTime Not Working: FaceTime is a miracle app that works like a charm, most of the time. It is an exclusive Apple product that enables you to video chat. With FaceTime, gone are the days of bad quality video calling. The app offers excellent service where video and audio calling are absolutely free. This coupled with the quality of calls that it offers has made the app a big hit worldwide. Despite all these, Apple’s great video phone call app and service isn’t above glitches and errors. Time and again users have often had to face problems like FaceTime not working among many others. Usually, there are a couple of common problems that users face. So we are here to tell you what to do when Apple FaceTime doesn’t work. Here are a couple of fixes:


FaceTime not working
Fix FaceTime not Working Issue with super ease

How to Fix FaceTime not Working iPhone and iPad

Update Your Device
One of the most common reasons behind FaceTime errors is that used don’t or have postponed their updating their device. To recall, back in 2016, there emerged an issue with FaceTime while making calls or receiving calls because of expired device certificate. An Apple update had fixed the issue. Since then allowing update of your device usually seems to take care of the FaceTime issue.


Time and Date
Check the date and time to see if they are set correctly in your device. A lot of time conflicting time and date can cause serious problems on FaceTime. On Mac, click on Date & Time and then check the box next to “Set date and time” automatically and choose the server of the country you are from using the drop-down menu.


Push Setting in Mail
The app uses Push Mail to notify you of an incoming call. For iOS device users, got to Settings > Mail Contacts, Calendars > Fetch New Data and check if your Push setting is set to “On”.
Phone Number and Blocked List
To check if you have posted a correct phone number, go to Settings > FaceTime on your iOS device. See the Apple ID listed underneath saying “You can be reached by FaceTime at”. In case you don’t then tap on “Add Another Email”.
If you failed to make a video call to someone, then perhaps you have accidentally added the contact to the blocking list. So you want to check that out, go to Settings > FaceTime > Blocked on your iOS device, and see if the contact is listed there. If yes, then tap on Edit, then tap the red Remove icon next to their name and Unblock.
These are more or less the common FaceTime not Working issues we hope you were able to take care of your problem. Now let’s move on the FaceTime errors in Mac.
Check FaceTime for PC Guide as well!!

Fix Facetime not Working Problems for Mac

In order to resolve FaceTime for Mac activation and usage issues, you need to learn the system requirements for FaceTime for Mac and follow some basic troubleshooting steps. Here we go.
As per Apple Support, for Video calling, you Macbook will require the following:
Sponsored Ads
  • Verify that the latest software updates for their Mac are done.
  • Verify that FaceTime is enabled in FaceTime > Preferences. If the issue persists, or if you see the message “Waiting for Activation”, try toggling FaceTime off and then on.
  • Verify that the Date, Time, and Time Zone are set correctly: From the Apple menu, choose System Preferences > Date & Time > Date & Time. Enable “Set Automatically”. Click the Time Zone tab and confirm the closest city is correct.
  • Verify that the device is connected to broadband Internet connection. If you encounter issues using a Wi-Fi network, use standard Wi-Fi network troubleshooting to resolve interference and other issues.
  • Verify the phone number or email address being used is the correct one activated for FaceTime.
  • You can verify that you are using a valid Apple ID at appleid.apple.com. You can also create an Apple ID or reset your password from this website.
Also Read: FaceTime for Android (Possible?)
Wrap Up:
FaceTime not Working error hacks are really easy. For the most part, the app doesn’t cause any major problem and usually has a pattern of errors. We listed the most common one’s and hope they come handy to you. If you are facing a problem besides these usual one’s then, reach out to us from the comment section below.

How To Boot Into Windows 10's Safe Mode ?|stock rom go to rompure.com

How To Boot Into Windows 10's Safe Mode ?


Contents:
Method One: System Configuration
Method Two: Tapping F8
Method Three: Shift + Restart Combination
Method Four: Boot From A Recovery Drive
Method Five: With Auto Registry

Method One: System Configuration

The fastest way to launch System Configuration in Windows 10 is to use the Run window. To do that, press the Windows + R keys on your keyboard. Then, write msconfig in the text field and and press Enter or OK.


Another way, to reach the System Configuration screen by using Cortana search. Typing either msconfig or system configuration and pressing Enter will open the System Configuration panel.


Head to Boot, and note the Boot Options. Selecting Safe Boot from the options will force your system to boot into Safe Mode followings its next restart.


You can choose from additional options. Here’s what they do:

Minimal: Starts Safe Mode with the absolute minimal amount of drivers and services, but with the standard Windows GUI (Graphical User Interface).

Alternate Shell: Starts Safe Mode with a Command Prompt, without the Windows GUI. Requires knowledge of advanced text commands, as well as navigating the operating system without a mouse.

Active Directory Repair: Starts Safe Mode with access to machine-specific information, such as hardware models. If we unsuccessfully install new hardware, corrupting the Active Directory, Safe Mode can be used to restore system stability by repairing corrupted data, or adding new data to the directory.

Network: Starts Safe Mode with the necessary services and drivers for networking, with the standard Windows GUI.

Select Minimal, followed by Apply, and OK. Windows 10 will tell you that you need to reboot your device in order for the new setting to take effect. You can select to "Exit Without Restart" if you want this effect to happen later. If not, you can Restart Now and your device will automatically boot into Safe Mode.


Method Two: Tapping F8

The most common method of reaching Safe Mode was by tapping F8 but Windows 10 has F8 Safe Mode disabled. But here I will show you how to enable that option by using Command Prompt.
Right-click the Start menu and select Command Prompt (Admin). Select Yes in the User Account Control dialogue, if it appears. Command Prompt should now be open.


Type or Copy/Paste (Don't use CTRL+C or CTRL +V) the following command:
1bcdedit /set {default} bootmenupolicy legacy

And press Enter. Job done!


To undo this legacy command at any time, reopen the elevated Command Prompt as per the above instructions and type:
1bcdedit /set {default} bootmenupolicy standard

Method Three: Shift + Restart Combination

Use the SHIFT + Restart combination. Open the Start Menu and click or tap on the Power button.


Then, keep the SHIFT key pressed and click or tap on Restart.


Then, Windows 10 will reboot and will open Advance Boot Options. Choose Troubleshoot.


Then, on the Troubleshoot screen, select Advanced Options.


On the Advanced Options screen, choose Startup Settings.


Windows 10 will tell you that you can restart your device in order to change Advanced Boot Options, including enabling Safe Mode. Press Restart.


After Windows 10 reboots, you can choose which boot options you want to use; use F4 - F6 to use the Safe Mode boot option.


Shortcut Method:

Open the Settings menu and head to Update & Security > Recovery > Advanced Startup. Clicking Restart Now will restart your system in recovery mode.

Method Four: Boot From A Recovery Drive

Use the Recovery Drive app to create a system Recovery USB Drive.


Once USB recovery drive is created, use the drive to boot your Windows 10 device and, when you're asked to load its content, do so.

The first screen will ask you to choose the layout for your keyboard. Select the one you want to use, or if you don't see it listed, press on "See More Keyboard Layouts" to get the complete list of available layouts.


Once you chose your Keyboard Layout, on the Choose an option screen, select Troubleshoot.


After selecting the Troubleshoot option, follow the instructions giving in the "Method 3".

Method Five: With Auto Registry

To Boot into Safe Mode you can copy the text below to Notepad and save it the extention .REG and then launch the file.

1234567RunWait('bcdedit /set {current} safeboot Minimal', "", @SW_HIDE)
;Runwait(@ComSpec & ' /c ' & @WindowsDir & '\system32
eagentc /enable', "", @SW_HIDE)
RunWait('bcdedit /copy {current} /d "Windows 10 (Safe Mode)"', "", @SW_HIDE)
RunWait('bcdedit /deletevalue {current} safeboot', "", @SW_HIDE)
RunWait('bcdedit /set {current} bootmenupolicy standard', "", @SW_HIDE)
RunWait('bcdedit /timeout 5', "", @SW_HIDE)

How to play .DAT or any video file in mx player|stock rom go to rompure.com

How to play .DAT or any video file in mx player

mx player

MX player is the best video player available for android phones. The biggest strength of MX Player is that it can play a wide variety of formats. You can play any video file in mx player. Some formats are not supported by default like .DAT video files but you can add these formats manually.

You need:
1. MX player (Install from play store)
2. Arm v7-Neon (XDA)

Follow these steps to add file extensions manually:

Step 1: Open mx player -> Settings

Step 2: Open List

Step 3: Open File extensions

Step 4: Tap Add to add new extensions

Step 5: Write extension name (example: DAT) and tap OK

Step 6: Select added extension (i.e. DAT) and tap Decoder

Step 7: Select software decoder (S/W)

Step 8: Press back button to close settings and tap refresh button in mx player

Step 9: You’ll see new video files of added extension. If you see any other data file then you can hide them by long pressing them.

Step 10: Now play any video file in mx player.

Manually installing Android ADB USB Driver|stock rom go to rompure.com

Manually installing Android ADB USB Driver

This tutorial explains how to install the Android ADB USB driver manually.

1. If yon don't have Android SDK installed, please install it first.

2. Open Start menu. Select Android SDK Tools -> SDK Manager. Right-click on it and select "Run as Administrator".

SDK Manager

Running SDK Manager as Administrator is very important. If you just click on it, the SDK manager will start, but will encounter errors when you try to install new components!

3. In the SDK Manager select "Extras->Google USB Driver". Enable the checkbox and click "Install 1 Package".

Google USB Driver

4. When the Google USB driver is installed, plug in your device.

Warning: The driver won't install automatically. We will do it manually in the next steps.

5. Open the System Properties dialog (press Win+Break on the keyboard or locate "Computer" in Start Menu, right-click on it and select "Properties".

6. Click on the "Device Manager" link.

Device Manager

7. In the Device Manager locate your Android device. Then right-click on it and select "Update Driver Software".

Update Driver Software

8. Select "Browse my computer for driver software".

Browse

9. Select "Let me pick from a list of device drivers on my computer".

list of device drivers

10. Select "Show All Devices".

Show All Devices

11. Press the "Have Disk" button.

Have Disk

12. Enter the path to the Google USB driver. Normally it is located in the following directory:
C:\Program Files (x86)\Android\android-sdk\extras\google\usb_driver

driver path

13. Select "Android ADB Interface" from the list of device types.

Android ADB Interface

14. Confirm the installation of the driver by pressing "Yes".

driver by pressing

15. Confirm the installation again by pressing "Install".

Confirm the installation

16. When the installation is done, press "Close".

installation done

So this was our guide on Manually installing Android ADB USB Driver, I hope the methods given above helped you.

How to Add Sitelinks Search Box on Search Results|stock rom go to rompure.com

How to Add Sitelinks Search Box on Search Results

To make content searches easier for your users, add just one markup declaration on your home page, telling the Google crawlers that users can search your site directly from Search results. Once we scan your home page and after users perform relevant navigational queries for your property, the search box appears in results. If you also have an app that corresponds to your website, add another line of markup so that your app users can search their apps directly from a mobile device following a navigational query.

The following illustration shows a navigational query for pinterest from the desktop, which then displays a Sitelinks search box above the sitelinks for Pinterest. The user can search "pizza" directly in Search results to open content in the Pinterest site.

Sitelinks Search Box

How do you set it up?

The Sitelinks search box setup involves the following general steps:

1. Install a working search engine on your web site.
Sitelinks search queries send the user to the search results page for your site, so you need a functioning search engine to power this feature.

2. Put the schema.org markup on your homepage.
Your home page is the only page that requires markup to specify a Sitelinks search box. The JSON-LD examples below show all the elements you need for a site-only search box.

3. Wait for Google Search algorithms to identify your site or app as a candidate for the new Sitelinks search box.

123456789101112<script type="application/ld+json">
{
"@context": "http://schema.org",
"@type": "WebSite",
"url": "https://www.example.com/",
"potentialAction": {
"@type": "SearchAction",
"target": "https://query.example.com/search?q={search_term_string}",
"query-input": "required name=search_term_string"
}
}
</script>

4. Copy and paste the following code into a plain text document:
5. Add your website to the “url” section of the script.
6. Add your website search links to the ”target” section of the script.
7. Copy and paste your edited script into the head or body of your webpages.
8. Troubleshoot your script with Google’s Structured Data Testing Tool.

How to add your organization's logo in search results|stock rom go to rompure.com

How to add your organization's logo in search results

Specifying Your Organization's Logo

You can specify which image Google should use as your organization's logo in search results and the Knowledge Graph.

To do this, add schema.org Organization markup to your official website that identifies the location of your preferred logo.

organization's logo

For example, a business whose homepage is www.example.com might add the following markup using visible on-page elements on their homepage:

12345678    <script type="application/ld+json">
    {
      "@context": "http://schema.org",
      "@type": "Organization",
      "url": "http://www.example.com",
      "logo": "http://www.example.com/images/logo.png"
    }
    </script>

This example indicates to Google that this image is designated as the organization’s logo and, where possible, may be used in Google search results. Markup like this is a strong signal to our algorithms to show this image in Knowledge Graph displays.

To add your organization's logo to your website’s, follow these simple steps:

1. Make sure you have the ability to add script to your website’s backend. If you don’t, send these instructions to your website developer.
2. Copy and paste the following code into a plain text document:
3. Add your website to the “url” section of the script.
4. Add your organization's logo links to the ”logo” section of the script.
5. Copy and paste your edited script into the head or body of your webpages.
6. Troubleshoot your script with Google’s Structured Data Testing Tool.

How To Delete Facebook Account Permanently|stock rom go to rompure.com

How To Delete Facebook Account Permanently

Facebook is world largest social media platform where we make account, pages groups to connect with people around the world. As we create account which works like our identity, its really easy to find someone with their name and information to connect with them through Facebook. We can use various method to connect with friends, family and other people. As we add people in our personal account and even you can create pages to connect with fans at large extend just because Facebook account are limited. Sometimes we have crossed our maximum friend limit in account then its really become problem for us to connect with more people. I know Facebook introduce following features but Facebook pages are more flexible to reach more audience than account.

Today i am going to explain one more important features which ever user need to know is deleting Facebook account permanently. As their is not option available in account to delete any account permanently. As you can deactivate but which you can activate again in future whenever you want. In some condition we have more Facebook account or even some reason we want to delete account permanently then we want to delete permanently but we are unable to find option. If you also want to delete Facebook account permanently then i will explain you a method to delete account. This process takes around 14 days for permanent deletion. So follow method steps by steps carefully to complete deletion.

Steps To Delete Facebook Account Permanently


* First of all Open you Facebook account which you want to delete permanently.

* Then open the page to delete account From Here.

* After that click on Delete My Account Button.

facebook delete account request

* Now Security check box will appear and enter your password and captcha text to continue.

* Then Message Will appear about Account Deactivation for 14 days and after that account will be permanently deleted.

facebook account permanently deleted

* After completing 14 days your will be deleted permanently and make that you will not have to log in again after submit a request for deletion because if you continue to log in then account be activated again.

* If you login again then you will see this message in your account. Then you have 14 days to continue and cancel account deletion process.

facebook account deletion scheduled

I hope this will help you a lot and you have learn how to deleted Facebook account permanently.

How To Hide Local Disk Drive Using CMD Diskpart|stock rom go to rompure.com

How To Hide Local Disk Drive Using CMD Diskpart

As Every computer user have some personal or private data which they want to hide or protect from others. If you want to Store Less amount data which you can easily Store in Folder.

But If You want Hide large account of data or want to hide full drive from others. Then follow these steps carefully

Hide Local Disk Drive Using CMD Diskpart

Steps To Hide Your Local Drive

  • Go To Start >> Then Run >> Then Type Diskpart
  • New black Window will appear and then type list volume press enter
  • Now your all drive will appear, now if you want to hide Drive D
  • Then Type select volume X and press enter. (Replace x with volume no)
  • Then Type remove letter D and press enter again.
  • Now Go to your my computer then you will find that your D drive is hidden.

Steps To Get Back Your Hidden Drive

  • Go To Start >> Then Run >> Then Type Diskpart
  • Then Type list volume press enter
  • Now your all drive will appear, now if you want to unhidden Drive D
  • Then Type select volume X and press enter. (Replace x with volume no)
  • Then Type assign letter D and press enter again.
  • Now Go to your my computer then you will find that your D drive is unhidden.
Then your Hidden drive will start appearing. Lets take one look on all steps in this figure

Note:- Volume No of each drive is according to its drive letter. Never use the same values as mention in the post. Volume no is just before the drive letter.

How To Stop/Disable Windows Updates In Windows 10|stock rom go to rompure.com

How To Stop/Disable Windows Updates In Windows 10

Microsoft release its new Windows 10 with its latest features and attractive look. Windows 10 becomes popular because it is free to install and user can update it from any of previous version of Windows. Windows 10 provide multiple desktop, that is each desktop with a separate task. New users of Windows 10 also like its personal assistant called cortana.
Windows 10 provide automatic update feature. It’s smart service automatic find and download, install its latest updates when we connect to internet. This feature is good for users how have unlimited internet connection. But some users are not interested in updating windows. There are many reason behind that like some user have limited internet pack or other reasons include software compatibility issues etc. Windows 10 do not provide feature to stop this automatic update in its Windows update settings. If you also suffer from this feature of Windows 10 and wanted to stop it then this article is really for you. In this article we are going to explain about different methods to stop automatic updates of Windows 10.

Method 1st :- Stop Windows 10 Updates From Services.


Step 1. To stop the windows 10 updates you should first go to the control panel.
Step 2. In the control panel go to Administrative tools.

control panel Administrative tools

Step 3. Then look for services option.

adminstrative tools services

Step 4. In the services window you will see many types of windows services running.
Step 5. In this window scroll down and to find windows update service and turn off it.

Windows 10 services

Step 6. To turn of this service you have to right click on the service and click on the properties option.
Step 7. In the properties options select general setting.
Step 8. In the general setting look for start up type option and select disable option.
Step 9. After that look for service running status and click stop button.
Step 10. Click on OK and your automatic updates will stop after that.

windows 10 update service properties

Method 2nd:- Disable Windows 10 From Network Settings


If you have limited internet connection and you want to stop automatic updates of Windows 10 and other Application then you can take advantages of Windows 10 Amazing feature called metered internet connection. By using this feature you can stop Applications and Windows from updates. To set your internet connection as metered you have to follow the below steps.

Step 1. Open the settings Apps in Windows 10.
Step 2. After that select Network & Internet.

Windows 10 settings

Step 3. After that Scroll down and look for Advanced options.

Windows 10 settings Network and internet

Step 4. Then select the Set as metered connection option.

Disable Windows Updates In Windows 10

Step 5. Now this option will be set for all WiFi Network.So these are some best possible ways to turn of windows 10 updates. In case you have any problem or you know any other best method let us know.